Sculpture
I’ve started making metal sculpture. This is my first one. Here’s a movie of it. It’s about 6’4″ tall with the pedestal (the hand itself is about 3’10”). That tall plant is a giant fennel that’s been growing in our garden for years.
THE PROCESS
STEP 1: THE ARMATURE
My friend, Rod Russell (an engineering scientist at UT Austin), invited me to play around with his welder in his carport. He let me have a bunch of big lag bolts, and some 1/4″ solid round. I also gathered up some other scrap metal at a junkyard, and got some 1/4″ tension rods. There’s a windshield wiper and some other car parts in there. I’m guessing this took maybe three full days total, once all the adjustments were made.

STEP 2: METAL SHOP APPRENTICE
I realized I wasn’t very good at welding and needed instruction and more practice. So, I called up Metal Works Austin, and they agreed to meet me and then agreed to let me do a short apprenticeship there. I did some work for them for free, in return for a bit of instruction and for them letting me use their space and equipment. Ryan Scott-Nairns showed me how to use an acetylene torch to heat the metal in order to bend the pinky and the thumb into a more natural pose than I had originally.
STEP 3: PAPER MOCKUP
I inked up my own hand to visualize where I wanted each individual panel of metal.
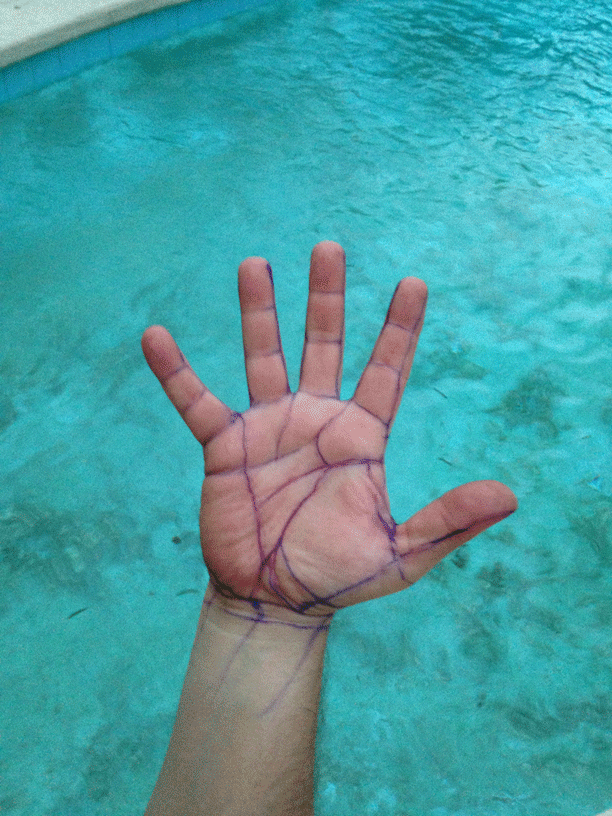
Thus informed, and before the ink washed off, I made a paper mockup on the armature using scissors, posterboard and tape. This took a couple of long days. 
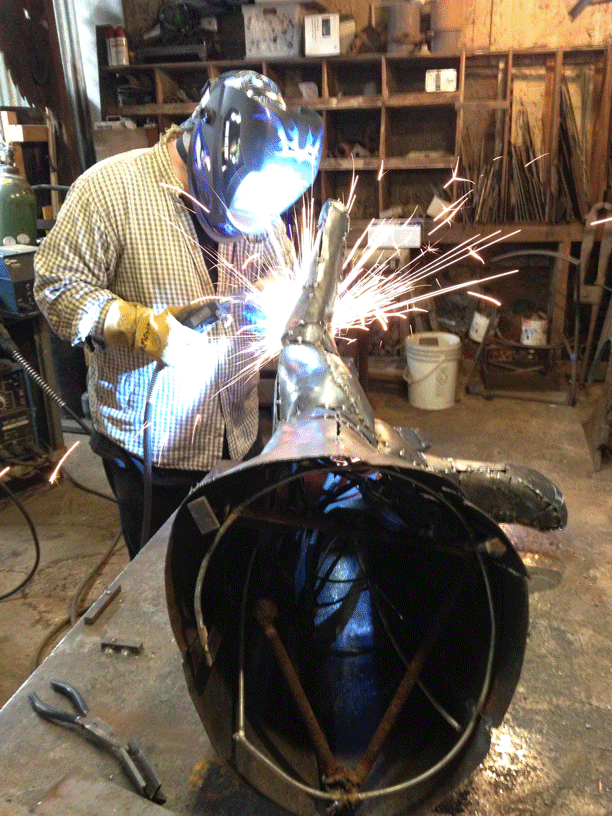
STEP 4: SHAPING AND ASSEMBLING
I cut the posterboard off of the armature and used the pieces as templates to cut out shapes from a sheet of 16 gauge steel using a plasma cutter. I then shaped each piece using hammers, an anvil, a big vise, and various other tools, and then tack-welded each piece into place using a MIG welder. I only smashed my thumb with a hammer once. And I only set myself on fire with hot lava-embers from the welder once. At least I was wearing a cotton shirt, as instructed. FYI – NEVER WEAR POLYESTER WHILE WELDING. It turns into instant napalm.

My hat is off to metal artist Croix Williamson, who was helpful, informative, and generously shared his off-color humor as well as his space and tools, including an enviable anvil. Also, thanks again to everyone at MetalWork Austin for letting me show my work at the West Austin Studio Tour! The piece wasn’t finished yet, but folks seemed to like it.
STEP 5: WELDING UP THE SEAMS
I used the same MIG welder with inert gas and .035″ steel wire. I went through a whole canister of gas, and probably half a spool of wire. That’s a lot of seams.
STEP 6: GRINDING, BRUSHING AND POLISHING
This is, without a doubt, the hardest part. It’s the hardest, dirtiest work I’ve ever done. It requires strength, endurance, patience, and care. Holding an angle grinder with a coarse sanding disk or a wire brush and pressing it against the surface while it jumps and bucks is like wrestling an angry beast. It takes hours and hours. You have to wear face protection, gloves, and a respirator so that you don’t breathe in the metal dust. And it’s dangerous! The grinder jumped out of my hand once and just lightly brushed against my ankle, leaving a nice little tomato-wedge of a wound. I WISH I had any pictures of me actually grinding, but I don’t. Oh well. Anyway, here’s what it looks like ground down and all shiny:

STEP 7: CLEAR COATING
I don’t have any pictures of this, but without it, the piece would rust within a day or two in humid weather. First, I cleaned the metal with a cloth soaked in denatured alcohol to remove any skin oils and any dust. I then applied four coats of PERMALAC (very toxic — you have to wear goggles, gloves, and a painter’s mask — but probably the best clear coat there is).
STEP 8: THE PEDESTAL
I went out to the Pipe Ranch and bought a 30″ length of 16″ pipe. The thing weighs about 200 lbs. It was absolutely covered in rust and old paint.
I welded a circle of 14 gauge steel into one end, then ground down the seam.
Then I ground whole surface down, as I’d done with the hand. This was even more and harder work than grinding the hand, since there was so much rust and paint.
Then I clear-coated the pedestal.
Done! Also it’s for sale. If you’re interested in buying it, get in touch!

Mirror Prototypes
I want to make a series of these hand sculptures, each of them holding one of the Platonic solids made of inward-facing mirrors. I created some small prototypes of these mirror objects. This is what they look like on the inside:


